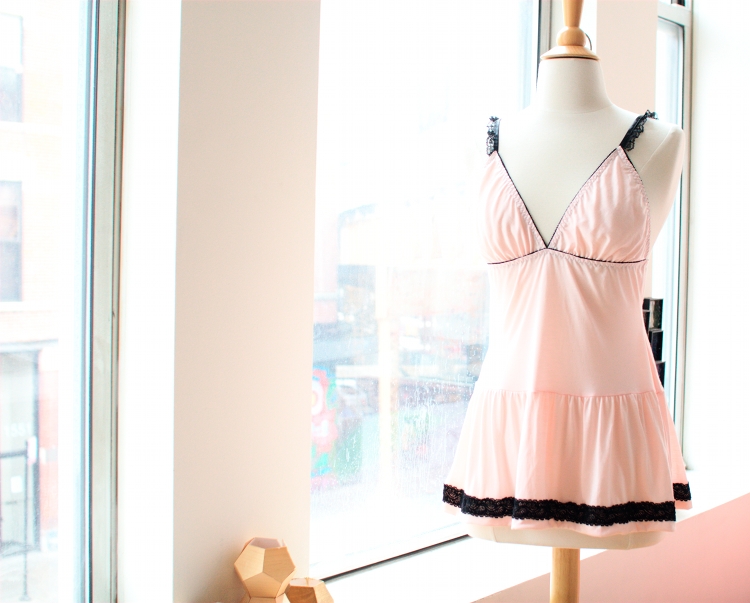
The slip is a garment that is much less common than it used to be. It is most often worn as a lingerie item but a simple slip is a great thing to have for wearing underneath a semi-sheer blouse, dress, or a sweater. This project tutorial is to make a fancy slip that would fall more into the lingerie category but if you omit the ruffled skirt it could easily be worn as a day-wear item.
The patterning instructions for the bra cups are here and the patterning instructions for the torso/skirt part of the slip can be found here. Don’t worry about your patterning skills – this is a beginning level patterning project for a pretty slip made from knit fabric.

Sewing Equipment
Sewing Machine (and optional serger)
Pins
Scissors
Thread
Rulers
Supplies
Knit Fabric with lots of stretch (look for something with spandex/lycra)
Elastic (I used finishing plush elastic)
Bra Staps
Stretch Lace Trim
Optional: Garters

Cut out your fabric. You will need to cut two torso pieces, two skirt pieces, and two bra cups.
With right-sides together sew the torso together at the side seams and the skirt panels together at the side seams. I used a serger to seam and finish the cut edge in one step. If you are using a traditional sewing machine make sure you use a stretch stitch (often the stitch symbol resembles a lightning bolt) and finish your cut edge with a zig-zag stitch.

When patterning, I added enough for a 1″ (2.5cm) plain hem. Measure and pin the hem in place. I wanted a row of lace trim on the skirt. I aligned the lace trim so I could sew the hem in place and sew one edge of the lace down at the same time. I have found that when sewing with knit fabrics, you should avoid unneccessary seams (like sewing the hem and then sewing the lace on top of the hem stitching) because they tend to distort the fabric.

Sew the hem and lace in place with a 3-step zig-zag stitch. If your machine does not have that as an option, a traditional zig-zag will work. Then, sew the other edge of lace in place using the same stitch type.

Prepare the skirt for gathering by sewing a line of basting stitch along the top edge of the front and a separate basting line along the top edge of the back. A line of basting stitch should fall in the seam allowance but be close to the final stitching line. If your final seam allowance is 1/2″ (1.25cm) the basting stitch should be sewn 3/8″ (1cm) from the cut edge. Basting stitch is the longest stitch length your machine allows (on most machines the stitch length would be set to 5). Leave long thread tails (6″/15cms or so) to your sewing as you will need to pull on those threads with your hands to gather the fabric.
We will (eventually) arrange the gather so it is even all the way around. To make that part easier, it is a good idea to mark corresponding points on the fabric that will be gathered and the fabric you are joining it to. For this project, obviously the side seams of the torso will match the side seams of the skirt so those don’t need to be marked as they are quite easy to find. I marked a second point of reference. I found the half-way point between each side seam and marked it with a pin. As you can see in the photo below, the torso has been marked at CF and CB, the skirt is marked with a pin halfway between each side seam. If you have a lot to gather or if the pieces are quite large, I suggest finding more points to match (like finding the halfway point between CF/CB and the side seams so you have 8 points of reference).

I have found that the best end result with this ruffling technique comes from scrunching all the fabric up and then working it loose to fit the needed length.
Most instructions on gathering tell you to do something like “pull the bobbin thread to gather the fabric.” First, “pulling” doesn’t really work. I hold the thread with my non-dominant hand (left) and use my dominant hand (right) to push the fabric away from my left hand along the thread I am holding. It is likely that you will push the first few inches at the beginning of the row and it will jam and not push anymore. Move your hand to the ungathered fabric just past the jam and slide that fabric along the thread. Then go back to the scrunched fabric and push it again – maintaining the thread stability with your non-dominant hand. This happens most frequently with fabrics that don’t have a lot of structure like knits and chiffons.
Second, I have not found the bobbin thread to be the thread I always hold when gathering. Depending on the thickness of your fabric and the tension setting on your machine it might be easier to slide the fabric along the thread that came from the spool. Every time I gather fabric, I test each thread and work with the thread that the fabric moves along.
Push the fabric toward the middle of the thread – gathering from both ends of the thread.
I have gathered all of my skirt fabric up together.

You will sew the torso to the skirt with right-sides together. Orient the pieces accordingly. Match the side seams of the torso to the skirt and pin in place. Find the half-way points that you marked with pins before gathering and pin the skirt to the torso at those match points.

Now you want to loosen the gathering by working the fabric in the reverse direction. As you do this, you want to release the fabric until it matches the length of what you are pinning it to (in this case, the torso). Do your best to evenly distribute the fabric gather. Pin the layers together to maintain the distribution until you sew it in place.

Sew the skirt to the torso. I typically sew with the ruffles facing up so I can make sure the fabric doesn’t end up pushed around and tucked in an unattractive way.
Now we are going to work on the bra cups. Before we start attaching elastic, it is a good idea to mark the needed match points. For attaching the bra cups, we need to know where CF is. That is easy to find by folding the front in half, matching the side seams and adding a pin to the halfway point. The bra straps fall halfway between the CB and the side seams. Find the CB then measure halfway between CB and the side seams to mark the bra strap point. Use safety pins to mark the points and pin the safety pins a little ways into the garment so the SA so the pins won’t interefere with the sewing.

Cut a piece of elastic that is 75% the length of the top edge of the torso. I used finishing plush elastic on the top edge of my torso so it would have a little edge of black trim. Another option for attaching elastic is to fold fabric over elastic and sew it in place like I demostrated in the original bra top project.
I added the elastic to my torso – but at this point I have only made the first sewing pass. Before I turn the elastic to the back and stitch in place I am going to add my bra cups and straps. Remember, when sewing with knits don’t over stitch or your fabric may stretch and distort!

Add your elastic to the bra cups. Again, I used finishing plush elastic for the edges of the bra cup. Just as we did in the original bra cup project, sew a line of basting stitch along the bottom edge of the bra cup between the CF and the mark point.

Gather the bra cup fabric. With right-sides together, match the CF of the bra cup to the CF point that you pinned before attaching your elastic to the torso. The outside of the bra cup should be matched to the side seam. No fabric should be gathered between the side seam and the mark point on the bra cup so pin the that portion in place before adjusting the gathered fabric. Stretch the elastic so the torso fabric lays flat. Distribute the bra cup gather evenly along the remaining distance between the mark point and CF. Pin in place at intervals to hold the gathered fabric in place.

In a previous post, I showed you how to make bra straps. Those straps are the exact ones I used on this project. Pin the bra straps in place using the safety pin markers for proper placement. My best suggestion for making sure the bra straps are oriented the proper way is to fold the elastic to the inside and pin the straps to the fabric how they should be when the project is complete. Un-fold the elastic and make sure the straps are properly pinned for sewing.
Sew the bra cups and bra straps in place by sewing over the stitches that you made for your first pass at attaching the elastic. Break your thread between the bra cups and bra straps (meaning only sew over the things your just placed; don’t sew all the way around the top of the torso).

Turn your elastic to the wrong side of the garment and complete the second sewing pass to secure the cut edge of fabric and edge of elastic.

Attach the other end of the bra straps to the top of the bra cups. You can use a sewing machine for this but I prefer to hand sew it in place because I have better accuracy sewing small pieces by hand.

An optional add-on to a slip like this is garters. The garters I own have a hook at one end so they are easily removable if I don’t want to wear any stockings while I have the slip on.
The positioning for the garters is pretty simple – each garter is placed halfway between CF/CB and the side seam.

Use short pieces of elastic to make loops for the garters to slip into. You should use the same width of elastic for the loops as the garter is wide. I didn’t have the right width (1/2″ / 1.25cm) so I used 2 pieces of 1/4″ (0.75cm) of elastic next to each other to create a 1/2″ wide loop. Not an ideal situation but I made it work wtih the supplies I had on hand!

Stitch the elastic in place. The line of stitching used to hold the elastic should fall in the seam allowance of the skirt so it doesn’t distort the finished appearance of the garment.

And that does it!
