These beaded hoop earrings are a fun way to use up left-over beads from a larger project, and they kind of have a ‘travel souvenir’ vibe to them. They’re made with brick stitch, and work up really fast, once you’re used to the technique.


Cut a reasonably long thread – at least 1 yard/1 meter and thread on the beading needle. Use one of the 15/0 beads to make a friction knot about 6 inches/15cm from the end of the thread. Add 1 more 15/0, stitch through the hoop, then back through the bead you just added as shown. Be careful not to catch the friction knot with the needle.

Gently tighten what you’ve done up, it should look like this.

Pick up another bead, stitch through the hoop, then stitch back through the bead again as shown.

Tighten it up neatly next to the first. Try to set this around 9 o’clock on the hoop. Keep repeating this until you have reached 3 o’clock on the other side. I used 22 beads to get there, be sure you use an even number.
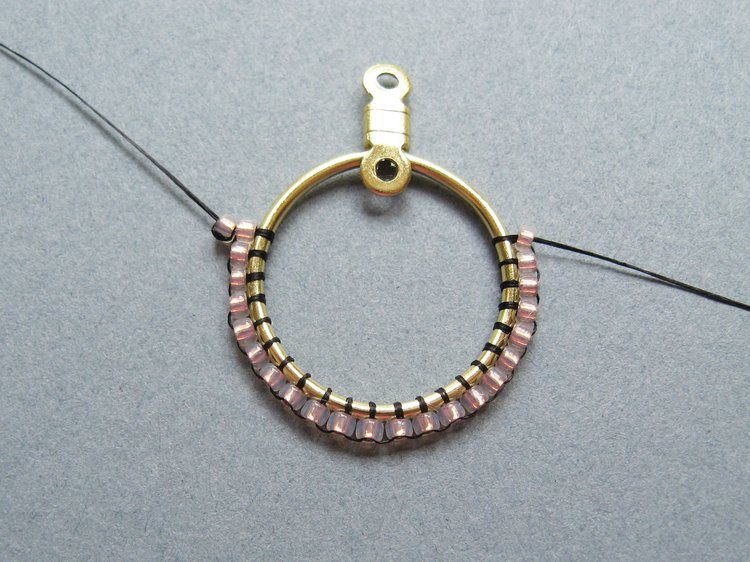
This is what it looks like with the first row finished.

String on a crystal, 2 Delicas, and another crystal.

Stitch between the second and third bead of the previous row. Your needle should go under the thread, not through it.

Stitch back through the second crystal you just added. Tighten it all, and be sure that the last bead of the first row is settled in place correctly – it might loosen up as you start this row.

Add 2 more Delicas, then another crystal.

Skip a gap between beads, then stitch through the next gap. You’ll want to add a crystal every other first row bead.

Stitch back up through the crystal and tighten.

Repeat this until you get back to the start. Stop when you’ve threaded on the last crystal.

To finish this row, go back through the first bead of the first row. Note how I’ve slid the friction knot out a bit to make it easier.

Go through the hoop, then back through that first row bead. This is the back of the hoop.

Double check that you haven’t made any mistakes so far, there’s no going back after this (apart from cutting it off and starting over.) Remove the friction knot and tie a square knot with the starting tail and the working thread. Make sure the beadwork is pulled up tight before tightening the knot.

Stitch back up through the last crystal of the last row and the Delica next to it.

Add a Delica, 3 11/0 rocailles, and another Delica.

Go through the gap between the second and third crystal of the previous row.

Stitch back through the last Delica you added. Tighten this up, ensuring that the loop of thread settles between the 2 Delicas added in the previous row.

Add 3 11/0 rocailles, and 1 Delica.

Stitch through the next gap in the crystal row.

Stitch back through the last Delica you just added.

Repeat this until the end of the row.

That row should look like this at the end.

Stitch back through the last row.


Going through those beads again will help the earring hold it’s shape.

At the end of the re-stitch row, go back through the crystal, down to where the starting tail is hanging out. Tie another square knot between the tail and working thread.

Weave in both the working thread and tail, following any path from the previous rows.

Trim the thread tails as close as possible.

Add a featured crystal to a headpin.

Bend the head pin over at the top of the bead.

Trim the headpin down to around 1/2 inch/1.25cm.

Use the round nose pliers to make that tail into a loop.

Attach a bead to the center of each hoop.

Add the earhooks and you’re done!