Is it just me, or does anyone else think that adding brick stitch to hoops is great? It looks so cool, and the method is so much fun. Striped hoop earrings look like a good time, and they would be a great way to use up some leftover beads from other projects. If you’ve never tried brick stitch before it might be easier to play around with this tutorial before beading on a hoop. If you fall in love with this like I did, I have another tutorial with a similar method that you can try, too. My ear hoops came from a craft store, but there’s no reason you couldn’t update a pair you already have, or pick some up at a store like Claire’s, too.


- beading needle
- beading thread – it will show a lot, so choose your color carefully – I used black Nymo
- sharp scissors
- earring hoops – about 1 inch/2.5 cm across
- 15/0 Toho seed beads
- 11/0 Delica seed beads
Bead Colors from left to right:
- 15/0 Toho #pf557
- 11/0 Delica #DB1523V
- 11/0 Delica #DB0800
- 15/0 Toho #704
- 15/0 Toho #7BDF
- 15/0 Toho #43

Start by cutting the longest thread you’re comfortable working with, threading the needle on, and adding a temporary friction bead a few inches from the end – you’ll need enough left over to put the needle on it and weave it in. I used Toho #43 for my first row.

Start at the back of the hoop, this end will have an extra loop of thread so it’s best to not have it right in the front. Bring the needle through the hoop, then stitch through the bead you added in the opposite direction you stitched the first time. Be careful not to get the friction bead involved.

Tighten up that first stitch (anywhere on the hoop) and add another bead.
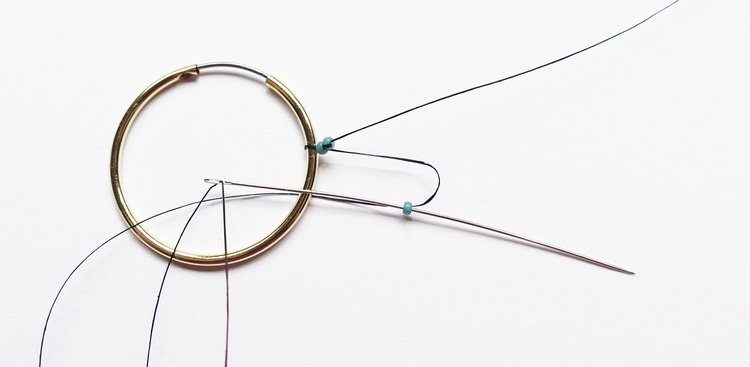
Stitch through the hoop, then through the bead in the opposite direction as you did the first time, just like before. This is the stitch you’ll use for the whole first row. It doesn’t matter which direction you stitch through the hoop, but go the same way every time. I went back to front, because that was the easiest way for me to hold it and work.

Add another bead, repeat that stitch.

Once you’ve added 3-4 beads, slide them to where you want them to be on the hoop. After 4 or 5 beads, it will be hard to move them around any more.

Repeat that stitch all the way around to the other end. My earring hoop had a little dent from attaching the hoop to the part that goes through the ear, so I stopped there. Stop close to the end of the hoop.
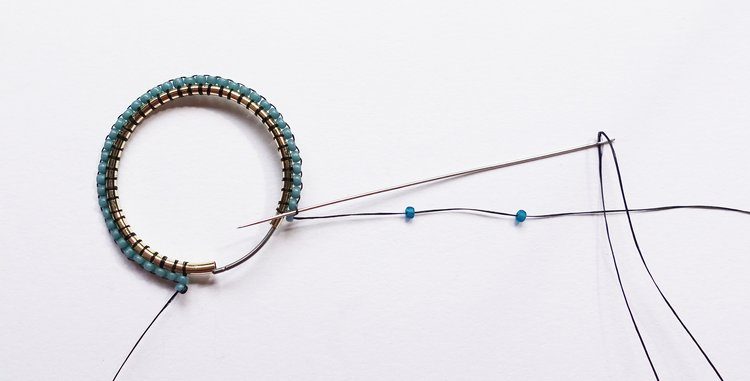
To start on the next row, add 2 beads, then stitch under the thread in the first gap from the first row. I used Toho #7BDF for my second row.

Stitch back through the second bead you just added.

Add a bead, stitch under the next thread gap, then back through the bead you just added.

Repeat that until you get to the end of the row. After the last gap, add one more bead, then stitch down through the end bead of the first row. Be careful not to involve the friction bead.

Stitch through the loop, then back through that end bead on the first row.

Remove the friction bead, make sure everything is tightened up neatly, then tie a square knot with your working thread and the tail. Leave the tail for now, and weave it in at the end.

Stitch back through the end bead on the second row.

Do the same thing you did at the start of the second row – add two beads, stitch under the first thread gap, then stitch back through the second bead. Continue with brick stitch through the rest of the row. In this row I used Toho #704.

At the end of the row, add 1 more bead, then stitch through the end bead of the previous row.

Stitch up through the second-to-end bead on the previous row, and the third bead on the current row.

Stitch through the second-to-end bead on this row.

And up through the last bead on the row. This puts you in position to start the next row.

Carry on, adding rows of beads, until you’re done. In this row, I used Delica #DB0800.
You may find that, since the rows are getting longer, the gaps between beads are becoming too large. To adjust, you can increase the number of beads in the row by adding two beads in one gap periodically. In this first row of Delicas I added 2 beads in ever 5th gap from the previous row. It’s a good idea to do this at a consistent rate (like my every 5th gap) so that if the adjustment is visible, it will look intentional.

I only increased on the first row of Delicas, but the beads and hoop you are using might require more or less frequent increases.
I added another row of Delicas in #DB1523V, then finished it with a row of Tohos in #pf557, which is a nice match to the gold hoops. At the end, weave in the tails, then make the other earring!


