How lovely are pretty lacey things to wear in the bedroom? A few weeks ago I showed you how to make lace and satin shorts. Now I will walk you through making the pattern for the custom fit matching bra top.


Supplies/Tools Needed:
I wrote in depth about the usefulness of patterning tools. Here is what you will need for this project:
Paper
Ruler
Pencil
Flexible Ruler
Scissors
You will need a few body measurements to make the bra top a custom fit.
Body Measurements needed:
Bust Radius: Measure from the fullest part of your breast to your rib cage
Underbust (ribcage): Around your body under your breasts – the measuring tape should be level to the ground

How to determine the width of each bust triangle
The width of each bust triangle needs to accommodate and hold the fullness of each breast. If you are using a stretchy fabric as this patterning tutorial is designed for the easy way to add fabric fullness is to incorporate a portion of gathered fabric. Between the fabric’s stretch and the extra width in key areas it should cover everything nicely and comfortably.
For this pattern 3″ (7.6cm) of the triangle toward the outside/under your arms will remain ungathered. The remaining part will be gathered to add extra fabric for support, coverage, and shaping.
Let’s figure out how wide the bottom of the triangle needs to be.
The starting measurement is your bust radius x 2 (Bust Radius of 3.5″ x 2 = 7″ | 8.9cm x 2 = 17.8cm). Subtract 3″ (7.6cm) from that measurement. The remaining length should be multiplied by 1.5 to create a section that is 50% fuller. If the difference between your full bust measurement and your underbust is greater than 6″ (15cm) you may want to multiply by 2 to ensure full coverage.
Your new number (adjusted for gathering) should be added to the 3″ of ungathered length. That is the bottom edge of your triangle. When you construct the bra top, the bottom edge should be gathered so it measures 2 x Bust radius.
Here is a basic size chart and math example.

Let’s move over to our paper and begin our pattern.
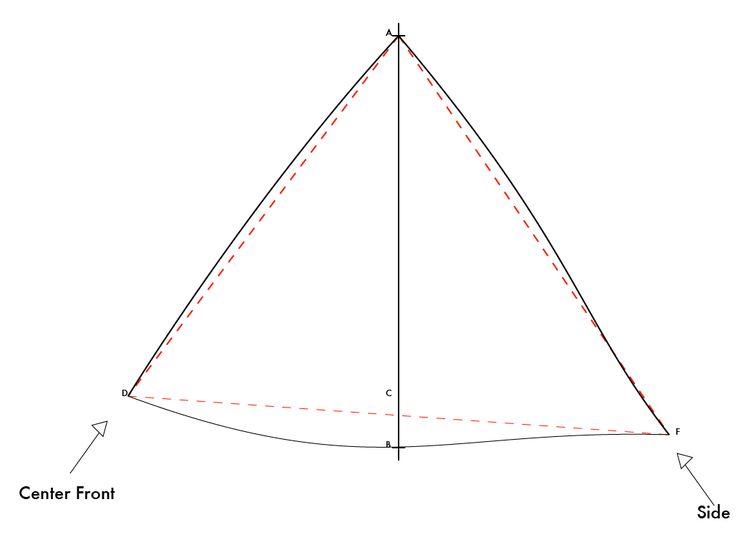
Draw a vertical line on your paper that is at least two times your bust radius measurement.
A-B: Twice your Bust Radius measurement
B-C: 1″ (2.54cm) Square out both directions. If you gathered 2x the fabric for a larger bust, you may want to make this measurement 1 1/4″(3.2cm) to 1 1/2″ (3.8).
D-E: Measurement from the chart above or determined from the math explained above.

E-F: Square down from E 3/4″(2cm). Connect D to F with a straight line.
Connect A to D, and A to F.

Now we want to add a bit of shaping to the pieces to accommodate the curves you are covering with lacy prettiness. The red dashed lines are the triangle drawn in the step before. I’ve marked the side and the center front for reference.
To accommodate the fullness near center front, the fabric will be gathered when sewn onto the underbust band. To ensure the fabric sits nicely when gathered, we want to add a bit of fabric below the triangle between CF and point B. We won’t be gathering the fabric near the side of your body so the line flattens out as it moves between point B and point F.
Between points A and D we want to add a slight outward curve. Between points A and F, add a slight outward curve closer to point A and bring it back to the original line as it approaches point F.
Finalize the bra cup.
• The grainline of the fabric is a straight line between points A and D. On the final pattern piece, I moved the line slightly inward to make it easier to use when placing the pattern on fabric.
• The stretch of the fabric should be perpendicular to the grainline. This has been marked (and labeled so I don’t forget when I get to the fabric steps).
• I placed a mark so I know where to stop gathering the fabric when I am sewing the sleep bra. This mark is 3″ (7.6cm) from point F/the outside of the bra cup.
• Add seam allowance. I am using 3/8″ (1cm) elastic on either side of the bra cup so I added 3/8″ seam allowance. I will be attaching the bottom edge to a 3/4″ (2cm) elastic bra band. Because I will essentially hiding the seam allowance of the bra cup behind the band, I added a seam allowance that is 1/2 the width of the bra band (3/8″).

Let’s move on and I will show you how to construct the bra top!