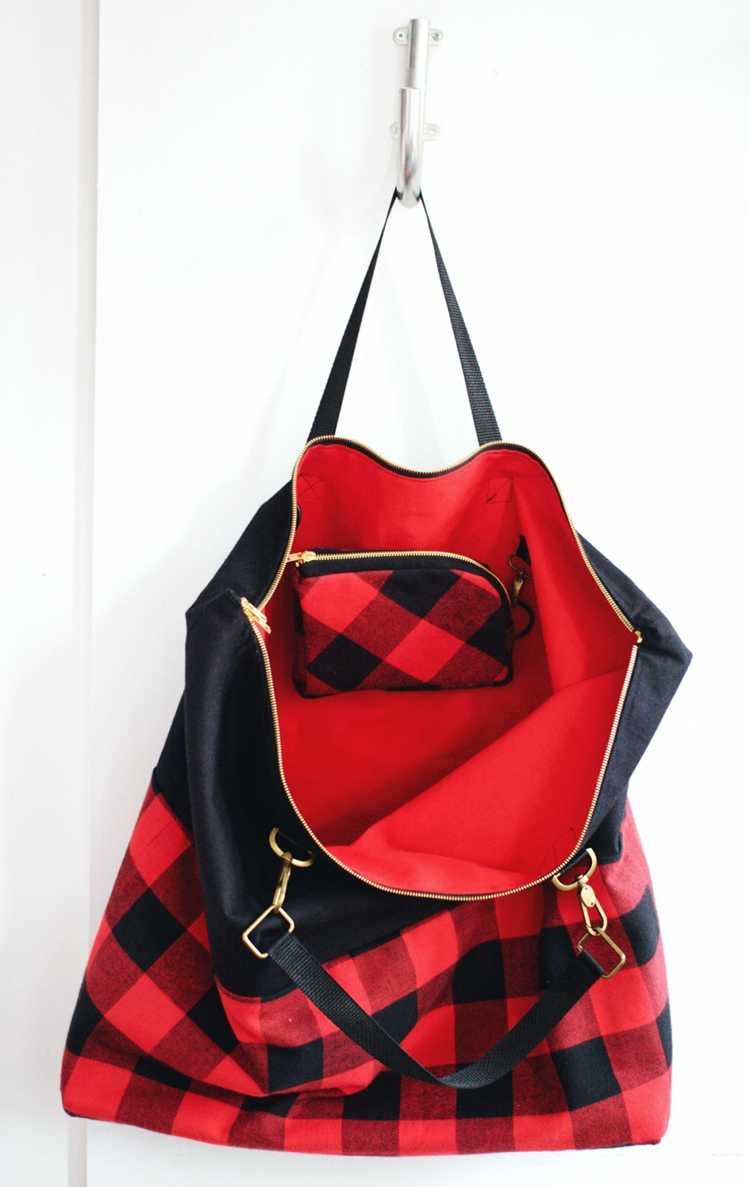
Having 2 bags that work together or separate can be incredibly handy for quick changes from day to evening. When getting ready to go out for the evening or on a quick trip save yourself the time of transferring your wallet, phone, and other small necessities into a small bag when you can simply attach your handbag inside your larger day bag for easy reach and quick exchanges with this two in one bag.

If you don’t have a lot of sewing experience but still like the idea, you could add a few loops with hooks and rings you pick up at a craft store to a handbag and tote bag you already own! In this post I will show you how to make both bags from the beginning to end.
This post is graciously sponsored by London Times Fashion.

Supplies
Fabric – For a large bag it is best to use a heavier weight fabric like canvas duck cloth for the lining at least – if not the whole bag.
Short Zipper – for the handbag (mine was 9″ | 23cm)
Long Zipper – for the tote bag (mine was 24″ | 60cm) I purchased a ‘Coverall’ style zipper so it opens from both ends
Webbing for bag straps – about 2 yards | 90 cm
2 large release clips
2 small release clips
4 Square or D- Ring (I have 2 of each style as that is what was available at the store when I was there!)
Optional: Interfacing
Tools:
Scissors
Optional: Rotary Cutter and Cutting mat
Rulers
Pencil
Paper (for making a pattern)
Sewing Pins
Sewing Machine
Thread

The Small Handbag:
Let’s start out making a pattern for a small handbag to hold your small necessities (phone, wallet, keys, etc). The steps to patterning a custom small handbag are quite easy.
First, determine the size of the bag. I could have squeezed everything into a 4″x 6″ (10cm x 15cm) bag but I decided to go a bit larger for more and created a 5″ x 7″ (13cm x 18cm) starting point. Begin by drawing a rectangle on your paper the size you want your bag to be (in my case, the rectangle was 5×7″/13 x 18cm). These will be your bag panels.
One option for bag size is to make one side of the bag the same length as the zipper plus a bit of ease. The zipper I purchased for the small bag is longer than the 7″ side of the bag so I curved one corner of the bag for the zipper to run along one edge and end part way down the next side. Mark the starting/ending points of your zipper. Leave a small gap of 3/16-1/4″ or 0.5cm at both ends of the zipper for ease. This makes everything easier to construct.

Add a seam allowance around your bag panel. Think about how you are going to finish the inside edges of the bag (basic zig-zag, bias tape, serging, etc) so you have an appropriate seam allowance to work with. I planned to use a 1/4″ (0.6cm) wide serging finish so I added 3/8″ (1cm) Seam Allowance (SA) to the bag.

If the bag is large enough around your objects, you can simply sew 2 bag panels together and have a perfectly good bag. I wanted the bag to have a bit of depth so I added side panels. I patterned the bag sides to be as wide as my zipper (including zipper tape). To do this you will need to pattern pieces that will support the zipper and a piece that wraps around the rest of the bag.
Measure and write down the length of the zipper + ease and the distance around the bag that is not part of the zipper support.
For the bag side piece that does not support the zipper:
Leaving a bit of room to add SA, draw a rectangle on your paper that is equal to the distance around the bag without the zipper and the desired depth of the bag. My desired depth was equal to the width of my zipper tape so that is how wide my rectangle is.
The long sides of the bag sides attach to the bag panels. Whatever measurement you chose for the SA of the bag panels, add that to both of the long sides of the rectangles. We will figure out the SA for the short ends when you pattern the next piece…
For the zipper supports:
For this bag I attached pieces of fabric to either side of the zipper. Zipper tape is typically not very wide on either side of the teeth (maybe 3/8″ or 1 cm). Sewing the fabric to the zipper tape 1/4″ (0.6cm) from the finished edge is a good distance for a secure finish but far enough from the zipper teeth to not jam.
The fabric will be sewn to the zipper tape and then pressed away from the teeth for an exposed zipper. If the side of the bag is going to be as wide as the zipper, that means the fabric on either side of will show 1/4″ (0.6cm) and then join the bag panels. I am using heavy weight duck canvas for the bag so I actually patterned those pieces to show 3/8″ (1 cm) to accommodate the roll back of the fabric. Lighter-weight fabrics would not need the extra ease because they are thinner and less rigid therefore you get a tighter fold back.
Start with a rectangle that is as wide as what will show next to the zipper (in my case, 3/8″ or 1 cm) by the length of the zipper plus the ease added to either end of the zipper when patterning the bag panels.
Add your SA – remember that the side that will be joining with the zipping will have a 1/4″ (0.6cm) SA, the opposite long edge will connect to the bag panel so that SA should match what you added to the bag panel.
Joining the zipper support to the bag sides – the short ends of both of the side pieces will join together. When deciding this SA width, think again about how you are going to finish the edge. Add the desired SA to the short ends of the zipper supports and the bag sides. I stuck with 3/8″ (1cm) like I used on the other part of the small handbag.

The Large Tote:
A basic tote bag is simply 2 rectangles of fabric sewn together along 3 sides with bag straps added. The bag shown below is a bit more complicated but starts from the simple tote idea. I made the outside of this tote 2 different fabrics, I attached a rectangle of fabric to make a flat bottom, a zipper was added to the top edge to hold the bag closed, and the bag is fully lined.
Note: I did not make a paper patter for the main tote bag as it was all math and rectangles. If it helps you visualize your project or you don’t have a good set of rulers, cutting boards, and rotary cutters to cut your pieces you should make a paper pattern.
Here is how I worked out the size and shape of the bag I made so you can manipulate the numbers to make a bag custom to your needs.
The width of the bag:
I was using a zipper in the top edge of my bag which set the width recommendations. I measured the length of my zipper and added 1″ (2.5cm) of ease. My bag: 24.75″ + 1″ = 25.75″ | 62.9cm + 2.5 = 65.4cm
The height of the bag:
The height was actually based off of the size/shape of one of the piece of fabric I used. The height is really up to you and what you want/need. My bag is 21.375″ | 54.3cm.
The bottom of the bag:
After I determined the width of the bag, I could determine the size to make the bottom. Decide how wide you want the bottom to be (I chose 6″/15cm). How long should the bottom be? Basic math will get us there: width of the bag – width of the bottom = length of the bottom. My Bag: 25.75″ – 6″ = 19.75 | 65.4 – 15 = 50.4 cm Therefore the bottom of my bag will be 6″ x 19.75″ | 15cm x 50.4cm
Lining:
If you want your bag to have a lining, you will need to pattern or cut fabric to be slightly smaller than the shell so that the lining fits inside the shell of the bag. I reduced each dimension by 1/4″ (0.6cm).
My bag:
Shell = 25.75″ x 21.375″ Bottom 6″ x 19.75″
Lining = 25.5″ x 21.125″ Bottom 5.75″ x 19.5″
or
Shell: 65.4 cm x 54.3cm Bottom 15cm x 50.4cm
Lining: 64.8 cm x 53.7cm Bottom 14.4cm x 49.8cm
Determine your SA’s and add them to your pattern or your cutting measurements if you are working without a paper pattern. I made all my seams 1/2″ (1.27cm) wide with the exception of the edge that attaches to the zipper which is slightly narrower at 3/8″ (1 cm) for sewing to the zipper tape.
Sewing the Large Tote:
Begin by cutting the side panels and bag bottom for the shell.

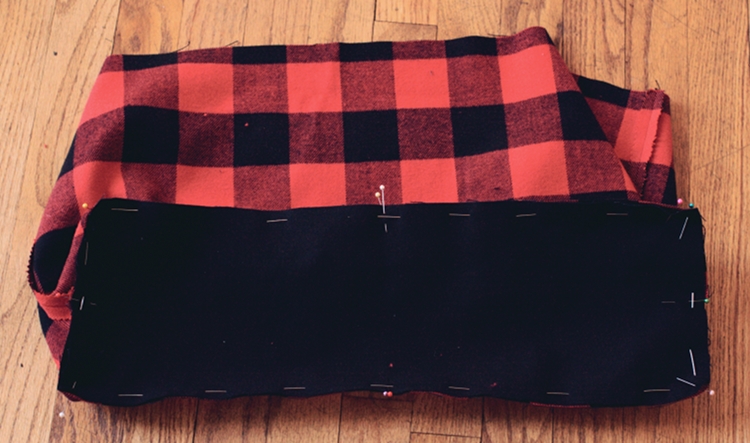
Sew the side seams of the bag with right-sides together.

Press the seams open.

*Note* I am making my bag from 2 separate piece of fabric. I am adding the zipper to the top and the bottom to the bottom of the bag before joining the 2 pieces that will make the shell of the bag to reduce how much fabric I am maneuvering around at the sewing machine.
Using pins to hold everything in place, align the zipper in place to be sewn. We added 1″ | 2.5cm of ease when patterning which means there is a 1/2″ or 1.25cm margin at either end of the zipper. With the right-side of the zipper touching the right size of the fabric of the shell and the zipper centered, pin one side of the zipper to the bag.


Sew the zipper in place along where it has been pinned – using the SA you determined when creating the pattern.


Pin the other side of the zipper to the right-side of the fabric in the same way you worked the first side.

Wrap the tails of the open end of the zipper over one another and sew in place.

*Note* If your bag is in 1 piece, make sure your zipper is at least partially open before sewing the bottom in place! Make sure you can at least put your hand through the opening of the zipper so you can turn the bag right side out after sewing.
Sew the bag bottom to the bottom edge of bag shell with right-sides together. Find the half-way point on the short ends of the bag bottom to match with the side seams of the bag. It is also helpful to find the half-way point of the long edge of bag bottom piece and the half-way point between the 2 side seams of the bag itself. Match these points when pinning in place to help get an even layout of fabric. Sew in place using the SA your determined. Turn right sides out and press for a nice finish.


At this point, sew the 2 piece of the bag shell together – right-sides together. Ensure the zipper is at least partially open before sewing everything together. Turn right-side out and press.

Construct the bag lining in the same way. Also, press the top edge SA of the lining toward the wrong side of the fabric.

Set this bag aside for now.
Prepare the Bag Straps and Clips:
To make this bag versatile and compact, the large bag is going to share a strap with the small handbag!

Begin by determining the length strap you need to have a comfortable wrist strap for the small handbag. I find 14″ (35.5cm) to be a good length to wrap around your hand and back to the same attached point on the bag but do what feels comfortable to you. A D-ring/square ring will be added to either end of the strap so an additional 1″ (2.5cm) should be added at either end of the strap. Cut 1 length of webbing that is the strap length + ease for sewing the rings in place and both ends. (Example: 14″ strap + 1″ + 1″ = 16″ | 35.5cm + 2.5 + 2.5 = 40.5cm). Sew the rings in place at either end. Below is a suggested stitching pattern.


Those rings will be attached to the large release clips for one of the straps on the outside of the bag. Clip the release clips onto the rings. Cut a short length of webbing that will be used to sew the release clips to the bag. The width of my release clips was wider than the webbing so I have the webbing at an angle to give wider support to the clip base.The strap for the opposite side of the bag will need to match the length of the strap with release clips for it to sit right when using. Cut a simple length of webbing that matches the length of the strap with clips.

To attach the small bag inside the large bag we need to have some clips and rings in place. 2 of those items need to be sewn into the seams of the handbag (or attached to the surface of a pre-existing bag if you are modifying something you already own). The remaining 2 items need to be attached to the bag for the handbag to clip onto.
One clip needs to be attached to the handbag on which the bag strap will attach. I attached one of the rings to the bag as I thought it would be less intrusive while using the handbag alone. Cut short pieces of webbing to wrap through the loops of the items you will be attaching to the handbag. These will be sewn into the seam connecting the bag panel and the bag side so they don’t need to be long (at least as long as your seam allowance + a 1/4″/0.6cm ease on either side of the ring/clip).
For the pieces you will be attaching to the large tote bag (or if you are top stitching the clips on a handbag you already own) the webbing should be a bit longer for better support.

Set these strap pieces aside for now.
Sewing the Small Handbag:
Cut 2 bag panels, 2 zipper supports, and 1 bag side from fashion fabric (aka that fabric you want for the outside of the handbag). Cut a second set of bag panels and the bag side from a second fabric to act as a lining. If the lining is a light weight fabric you may want to add interfacing (fusible or sew-in) to the bag. For additional stability, I cut a layer of duck canvas for the bag panels and bag side. When sewing everything together, place the fashion fabric and lining fabrics wrong sides together and treat as 1 piece.

Sew the zipper supports to the zipper – right sides together. Attach both sides and press.


Place the short ends of the zipper and supports right-sides together with the short ends of the bag sides (with bag lining). Sew these seams together. Press the seam away from the zipper. Apply your desired seam finish. This creates a circle that will be the entire side of the bag.

All these piece are going to be sewn together in the next few steps!

Place the clip that will attach to the handbag strap in place on the bag panel. The cut edge of the webbing should align with the cut edge of the fabric. Pin in place. I placed the clip so it will sit just below the zipper. I will place the d-ring just below the end of the zipper after I pin the bag side in place.

Pin the bag side around the bag panel right-sides together. The zipper starts at the corner and wraps around the curve. Pin in place. I added the d-ring just below the zipper but it could go pretty much anywhere along that top/side edge curve.

Sew the bag side in place. Here it is turned to right-side out.


Pin the other side panel in place. Sew in place.

Apply your chosen seam finish to both of the seams you just constructed (my seams were serged).

Turn right-side out.

Small Handbag, Meet Large Tote Bag:
Before we sew the lining into the large tote bag, let’s attach the clips/rings to hold the handbag.
Add the clip/ring opposites to your handbag clip/ring. Position the handbag near the top of the large tote lining. When you like how the handbag sits in place, pin the webbing attached to the clip/ring to the lining. It can be helpful to mark the halfway point of the bag lining so you can center the handbag.

Sew the webbing supports in place. It is easier if the handbag is not clipped in place during the sewing process.

If you want your large tote bag to have a sturdy solid bottom for better support of what you carry, try adding a chipboard bottom.
Final Construction Steps:
Add the lining to the shell with wrong-sides together by placing the lining inside he bag. Pin the lining to the main bag along the top edge. Sew through all the layers to secure in place OR hand stitch the lining to the SA of the zipper and shell to avoid having a line of stitching along the top edge of the bag.


Add the straps to the bag. I attached the lining to the shell first so that the bag handles have 2 layers of canvas of support. This is optional but if you plan to carry anything heavy in the bag it is a very good idea to have the extra support of 2 layers.
Find the half-way point of the top edge of the bag. Center the distance between the 2 strap ends over the marked half-way point. The distance between the straps will vary depending on how large the bag is and how long the bag strap is. I determined how far apart the straps should be while looking at the inside of the bag so I knew the straps would not overlap with the handbag supports.

My straps were 7″ (18cm) apart – 3.5″ (9cm) away from the marked center point. The strap ends should be the same distance from the zipper edge also. Pin in place.

Position the straps on the other side to match the first side. Pin in place.

Sew in place and your bag is ready to go! One strap of the large tote becomes the strap of the handbag. The handbag clips near the top of your tote bag so all of your small but important items are easy to reach at all times.